

Installing the XQ FIPS Helper Application for Windows

To meet CMMC requirements, you must install XQ’s FIPS Helper Application on your team’s Chromium-Based browsers. XQ's FIPS Helper Application is a CMMC-compliant software tool that implements FIPS 140-2 standards for cryptography. It provides additional functionality to a system by verifying the cryptographic module used on your team's machine is FIPS 140-2 compliant.
This article provides steps for installing XQ’s FIPS Helper Application for Microsoft Edge and Chrome browsers on Windows machines. The following steps are intended to be performed by an administrator.
Step 1: Create an XQ Directory folder in your Local Drive.

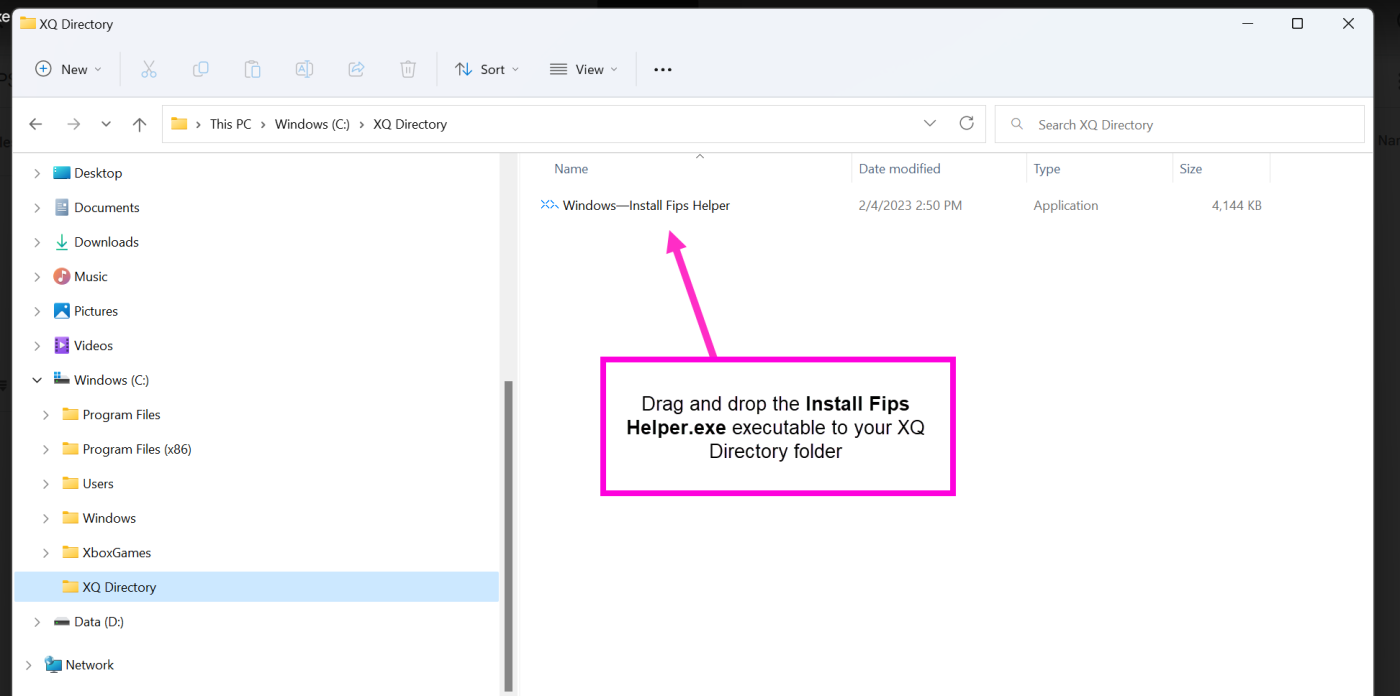
Step 2: Drag and drop the Install Fips Helper.exe executable into the XQ Directory you created in Step 1.
Step 3: On your Windows machine, go to Start and click Settings.
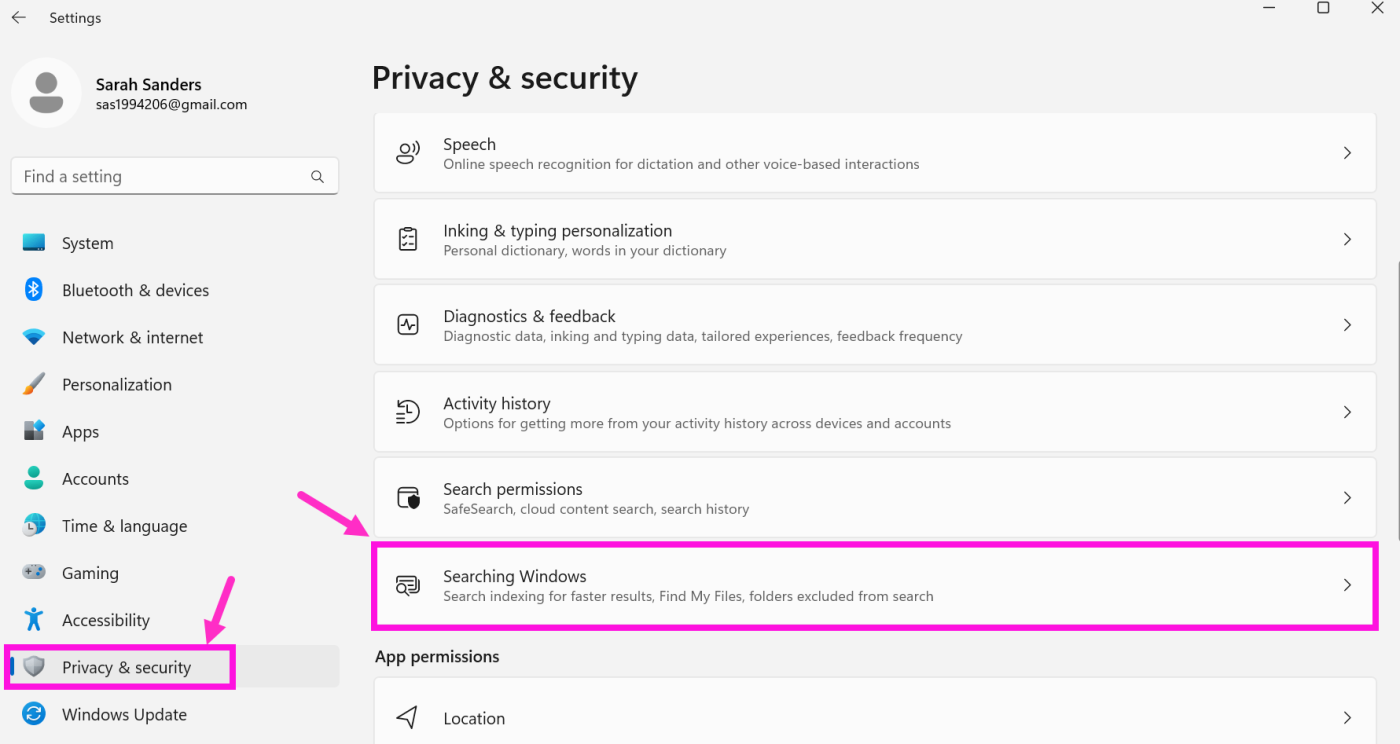
Step 4: Select Privacy & Security and click Searching Windows.
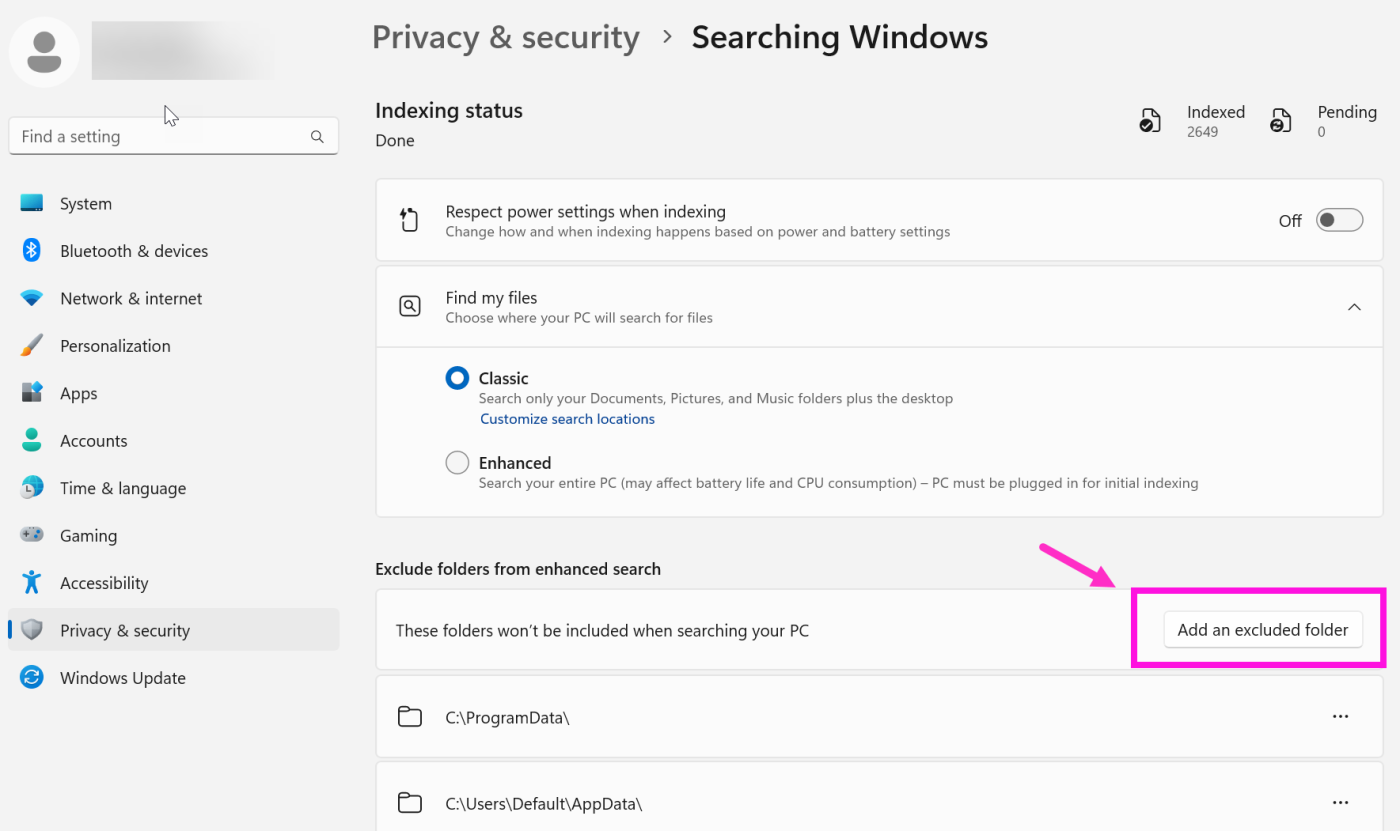
Step 5: On the Searching Windows page, click the Add an excluded folder button.
Step 6: In the Select Folder window, locate and double-click the XQ Directory folder you created in Step 1.
Step 1: Navigate to https://www.microsoft.com/en-gb/download/details.aspx?id=48145, select the language of your choice, and click Download.
Step 2: Select the vc_redist_x64.exe option and click Next.
Step 3: Run the vc_redist.x64.exe executable and follow the prompts to finish the installation. Double-click the Install Fips Helper.exe executable.
Step 4: You will be prompted “Do you want to allow this app from an unknown publisher to make changes to your device”. Click Yes.
Step 5: Click Install and follow the installation prompts. Ensure the Open Chrome Extension Folder checkbox is checked before clicking Finish.
Step 2: In the drop-down menu, select Extensions and click Manage Extensions.
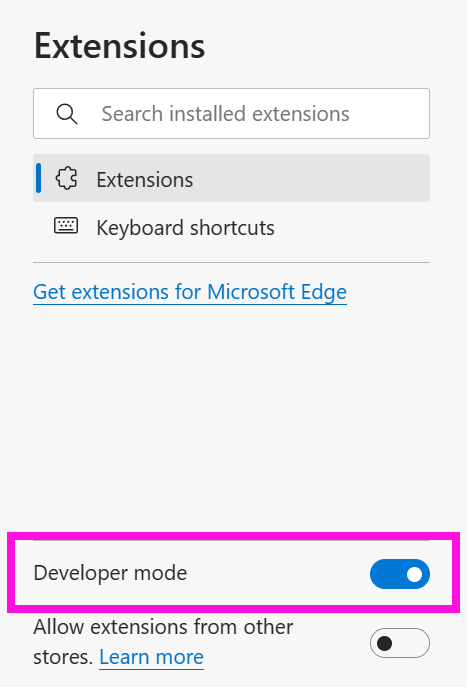
Step 3: On the Extensions screen, toggle Developer mode to On.
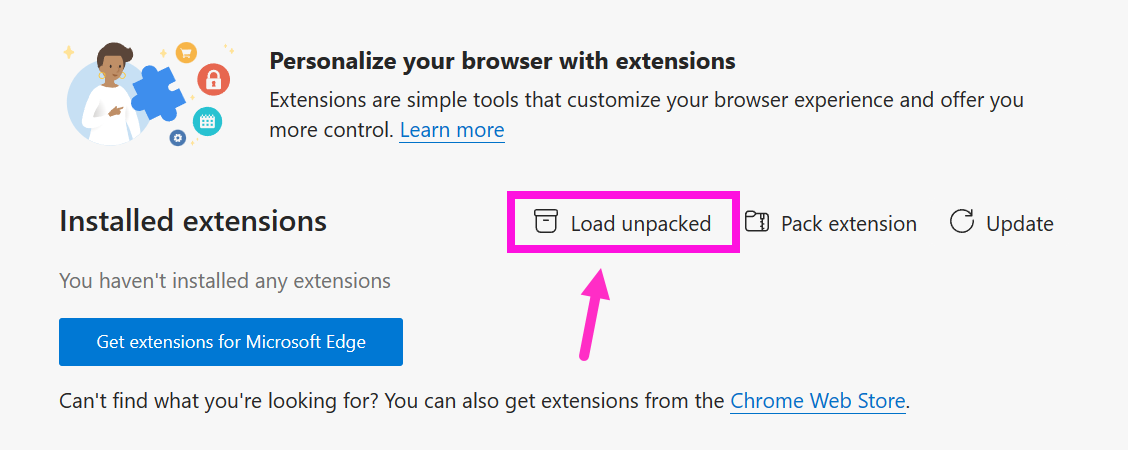
Step 4: Several hyperlinks will appear at the top of the screen. Click Load Unpacked.
Step 5: Locate and open your XQ Chrome Extension folder. By default, this is located at C:\Program Files\XQ Message Inc\Chrome Extension.
Step 6: The XQ Native Bridge extension should now appear in your Installed Extensions.
Step 2: In the drop-down menu, select Settings and click Extensions.
Step 3: Enable Developer mode by clicking the toggle and then clicking Load unpacked.

Step 4: Locate and open your XQ Chrome Extension folder. By default, this is located at C:\Program Files\XQ Message Inc\Chrome Extension.
Step 5: The XQ Native Bridge extension should now appear in your Installed Extensions.
This article provides steps for installing XQ’s FIPS Helper Application for Microsoft Edge and Chrome browsers on Windows machines. The following steps are intended to be performed by an administrator.
Note: This article uses steps and screenshots from Windows 11. Directions may differ slightly on older versions of Windows.
Bypass Windows Real-Time Threat Protection
To ensure the FIPS Helper installs correctly, you must create an XQ Directory that bypasses Windows Real-Time Threat Protection. Refer to the following steps to get started:Step 1: Create an XQ Directory folder in your Local Drive.
Step 2: Drag and drop the Install Fips Helper.exe executable into the XQ Directory you created in Step 1.
Step 3: On your Windows machine, go to Start and click Settings.
Step 4: Select Privacy & Security and click Searching Windows.
Step 5: On the Searching Windows page, click the Add an excluded folder button.
Step 6: In the Select Folder window, locate and double-click the XQ Directory folder you created in Step 1.
Prerequisite Installation
Before installing the FIPS Helper Application, you must ensure you have the Visual C++ Redistributable for Visual Studio 2015 application downloaded on your Windows machine.Note: If you already have Visual C++ Redistributable for Visual Studio 2015 installed, you can skip this step.
Step 1: Navigate to https://www.microsoft.com/en-gb/download/details.aspx?id=48145, select the language of your choice, and click Download.
Step 2: Select the vc_redist_x64.exe option and click Next.
Step 3: Run the vc_redist.x64.exe executable and follow the prompts to finish the installation. Double-click the Install Fips Helper.exe executable.
Step 4: You will be prompted “Do you want to allow this app from an unknown publisher to make changes to your device”. Click Yes.
Step 5: Click Install and follow the installation prompts. Ensure the Open Chrome Extension Folder checkbox is checked before clicking Finish.
Install FIPS Application on your browser
Microsoft Edge
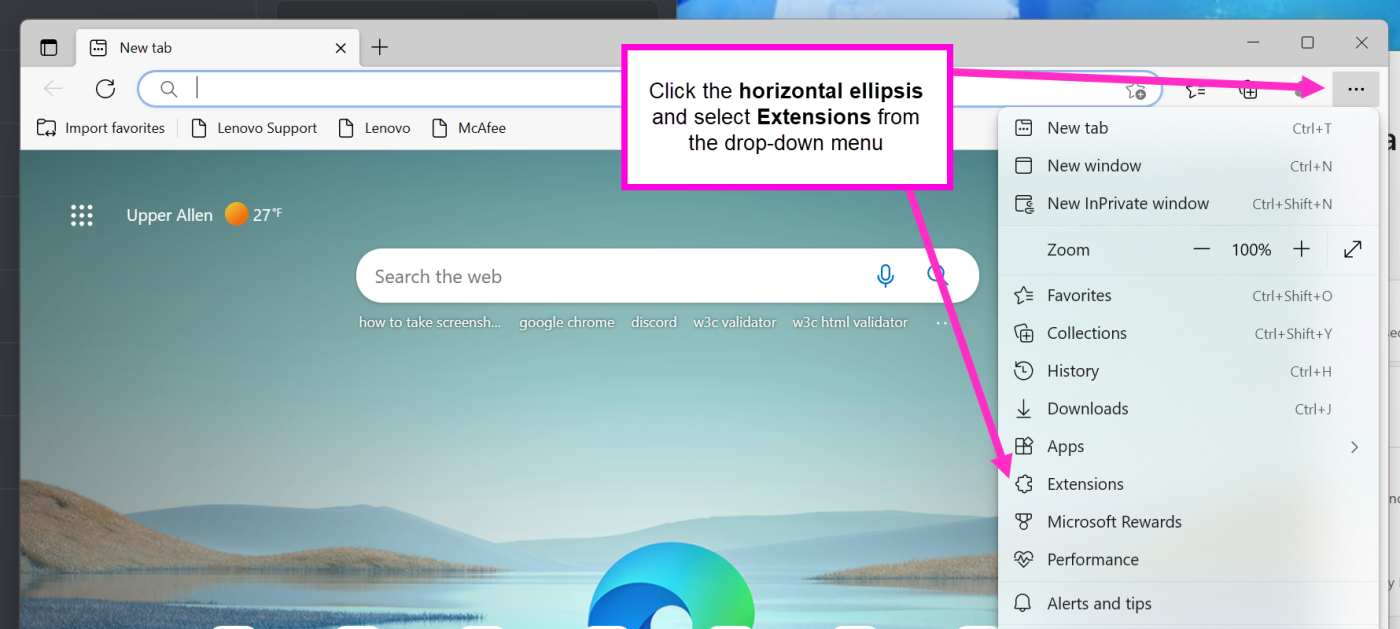
Step 1: Launch Microsoft Edge and click the horizontal ellipsis at the top right-hand corner of your browser.Step 2: In the drop-down menu, select Extensions and click Manage Extensions.
Step 3: On the Extensions screen, toggle Developer mode to On.
Step 4: Several hyperlinks will appear at the top of the screen. Click Load Unpacked.
Step 5: Locate and open your XQ Chrome Extension folder. By default, this is located at C:\Program Files\XQ Message Inc\Chrome Extension.
Step 6: The XQ Native Bridge extension should now appear in your Installed Extensions.
Google Chrome
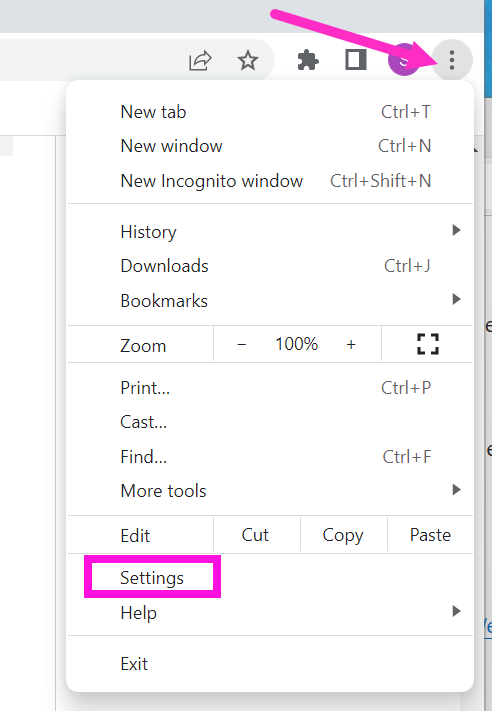
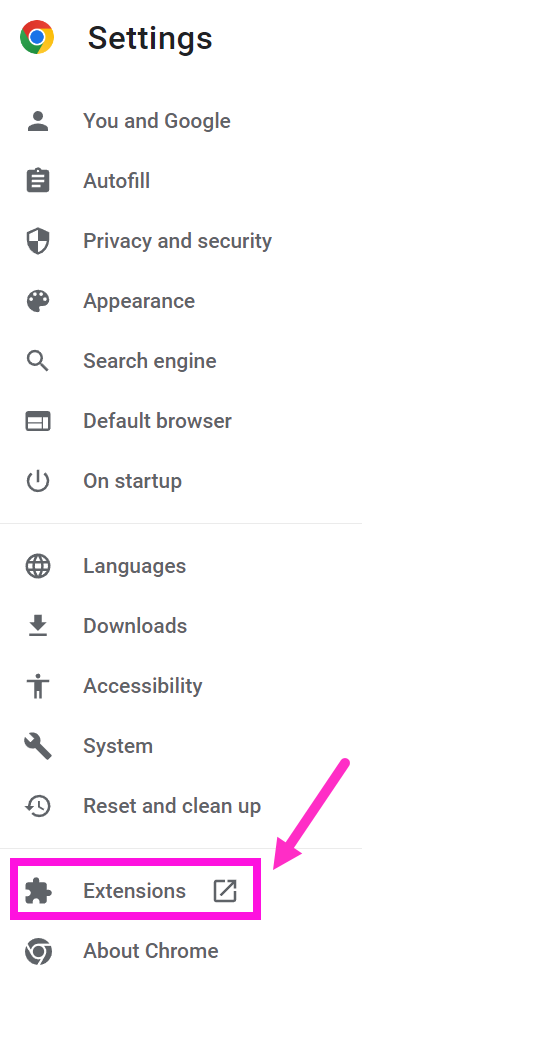
Step 1: Launch Google Chrome and click the vertical ellipsis at the top right-hand corner of your browser.Step 2: In the drop-down menu, select Settings and click Extensions.
Step 3: Enable Developer mode by clicking the toggle and then clicking Load unpacked.
Step 4: Locate and open your XQ Chrome Extension folder. By default, this is located at C:\Program Files\XQ Message Inc\Chrome Extension.
Note: Ensure the XQ Chrome Extension folder added in Step 4 is moved directly from your local drive to Chrome. If you move the folder to another location before adding it to Chrome, the installation will not work.
Step 5: The XQ Native Bridge extension should now appear in your Installed Extensions.